Two years ago today, Heather and Mike became Heather+Mike! Here’s to many wonderful moments together and many more anniversaries to come!
 Last year, I asked my food-loving friend Lauren if she’d like to undertake a culinary project with me. When I was small, my family made big-batch gifts all the time—jars and jars of homemade pickles or jam, preserved bounty from our garden, etc.—and often my Papa and Dede make ambitious trios for Christmas presents. One year: chili oil, Worcestershire sauce, raspberry vinegar. Another year: chili powder (Papa smoked the chiles), Herbes de Provence (Dede picked and dried the lavender), curry powder (Papa toasted and ground all the spices). Clearly, this is in my blood, but I live in New York City. Storage space is tight and I live far from at least half the intended recipients. A food gift seemed unmanageable.
Still, the idea of covering all my gifting bases with one project stuck in my craw until I saw a blog post that showed a small child making vanilla extract. You guys, a child. I think we can all agree: I’m not going to be outdone by a four-year-old. Extract is a fantastic project to start out with. It is extremely quick, requires no specialty tools, can be done by small hands (see this blog post to see Annelise, my 4.5-year-old motivator, helping her mom—but don’t store your stash in the window!), requires almost no cleanup, and results in a gift nearly everyone can use in a variety of ways. What’s not to love about vanilla extract? Commercial extract is made by soaking chopped-up vanilla beans in liquid that is at least 35% ABV (usually ethanol). However, sweeteners and colorants are often added, and the quality of the beans is not regulated. Blech. With this project, I could guarantee my friends were getting a quality pantry staple that would make their treats delicious all year long. Even better, when you’ve used about half the bottle, you can add more booze, give it a good shake, and your beans will keep flavoring the extract. It’s like the gift that keeps on giving! Did I mention it was pretty inexpensive? The cost per bottle drops as you make a larger quantity, and if you’re not mailing anything, it’s downright cheap.
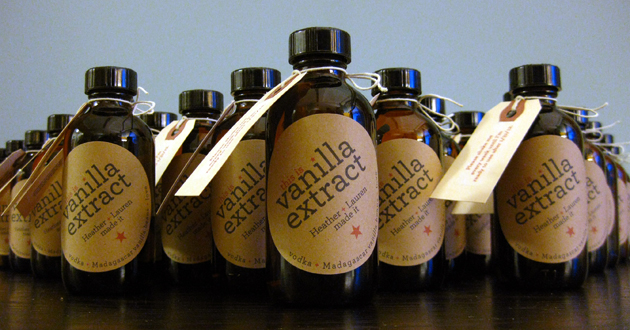
Lauren and I set up a date about a month before Christmas (more on that in a minute); in the meantime, I ordered the beans and bottles and whipped up a package design. After quick trips to pick up the booze and buy sticky labels, we were in business. I’d already run all our bottles through the dishwasher to sterilize them, so all we had to do to make the extract is cut up a couple of beans, shove ’em in the bottles, cover them with booze, give ’em a shake, and let ’em sit. That’s it. Really. It took longer to stick our labels on the bottles and tie on the little hang-tags than it did to actually make the goods.
Once you’ve got the bottles sealed, you should shake them every couple of days and let them sit in a cool, dark place for 2 months (I stashed mine in a cardboard box in my closet). Since we’d started a bit late, we just put tags on the bottles that explained both the “don’t use me until” info as well as the “how to replenish the bottle” tip. It worked perfectly! In January, I started getting text messages and emails from friends, saying, “Using the vanilla tonight in some cookies!” Just the other day at work, my executive editor mentioned she’s still enjoying her bottle. I use mine all the time, and every time I do, I get a little flutter of pride that I made it. You, too, can have this distinct pleasure. Even beyond the holidays, it’s great to have a few bottles of extract sitting around so I can give them as impromptu gifts, so I’d recommend tripling the recipe below (at the very least: Lauren and I made 40 bottles). Won’t you give it a try?
Homemade Vanilla Extract
Active time: 10 minutes | Total time: 2 months + 10 minutes | Makes: 8 ounces
Ingredients
4 vanilla beans
8 ounces vodka or Bourbon
Instructions
- Sterilize an 8-ounce glass canning jar and lid (or two 4-ounce glass bottles) by boiling in a large pot of hot water for 10 minutes or running through your dishwasher with the hot-dry setting [see update].
- With a sharp knife, split each vanilla bean lengthwise, trying not to cut all the way through. If you’re using short bottles, cut each bean in half to fit.
- Stuff beans into jar or divide among bottles (the typical recipe is 2 beans per 8 ounces of booze, but I like to make double-concentrated vanilla).
- With a funnel or a small measuring cup, add vodka, making sure to cover beans. Seal jar or bottles. Shake vigorously and let sit in a cool, dark place for 2 months, shaking briefly but vigorously every few days.
Notes:
- This recipe can be made in multiples, no problem. We made 40 bottles at once! Just do some basic math to sort out your ingredients. For 40 4-ounce bottles, we bought a 1-pound bag of beans and 4.5 liters of vodka. Note that your number of beans may vary, as produce never weighs the same, universally, due to size, water content, etc. For me, we got about 80 beans in a one-pound bag. You may find you get more/less depending on the variety of beans you buy, the supplier, etc.
- Some people make the vanilla in one big canning jar (say, a quart or larger) and then, once the beans have released all their delicious flavor after 2 months, they transfer it to smaller bottles for gifting. This works fine, but it means your recipients can’t make more vanilla in their own bottles. You, however, can make another batch using those beans that are still in your big jar. You must do what you think is right, of course.
- If you take your time to make your vanilla, just include a note on the bottle saying when it’ll be ready to use!
- UPDATE: My awesome friend Dora just made vanilla based on this post. The lids on her bottle caps had paper liners inside and when she washed the lids, the paper began to peel. She boiled the lids extra long so she could peel out all the paper and glue. I did not sterilize my lids, I think, because I did not encounter this. The paper liners in some tiny bottle lids help them stay watertight, so if you have paper lids in yours you may want to just rinse them briefly and trust they’re clean, since they came from the manufacturer. Sterilize canning jar lids and others without paper liners in the normal way.
Bottles: Amber Boston Round (4 oz.) with Standard Cap from Specialty Bottle
Beans: Madagascar Vanilla Beans from Beanilla
Booze: Vodka, though Bourbon also works well. Note that vodka bakes off cleanly, whereas Bourbon leaves behind its own flavor footprint in your baked good, delicious in its own right. It’s best to avoid the crappiest vodka, but you don’t need to go crazy. We bought Wódka Vodka, which is generally well-reviewed and has a great price point.
Labels: We used these 2.5″ round kraft labels from Avery (22808), but you can use anything you like. One note is that printing them on a photocopier or with a laser printer is better than using an inkjet, because inkjet stickers will bleed if grabbed with wet hands.
A note about shipping: It is illegal to mail alcohol through the USPS. I’m definitely not telling you to do it. But if you mail yours through other carriers (or just break the law), make sure you wrap your vanilla in several layers of bubble wrap and they should survive the trip without worry. These 4x4x6 corrugated boxes from Uline fit those 4-ounce bottles perfectly, once I’d bundled them in several layers of small bubble wrap.
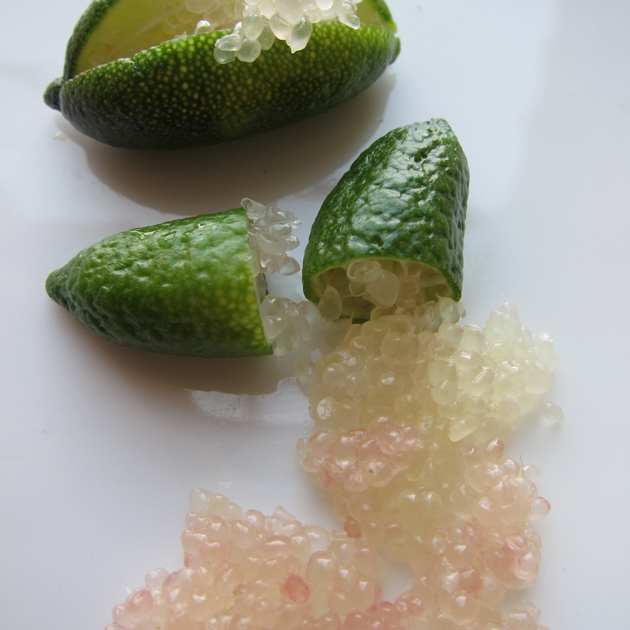
Last year, my Papa sent me a surprise package of goods, unbeknownst to me. He’s the kind of guy who does that, you know? I opened a nondescript box and out tumbled these curious green objects. What on earth were they? I did some googling and figured out he’d sent me finger limes, a microcitrus from Australia (not a true lime at all, actually). This wild fruit has only been cultivated commercially in the last couple decades and only within the last few years have they really come to the U.S. In the last couple years, a farm in California has been growing and selling them from trees they imported. And friends? They are delicious! They taste a bit like a lemon-lime combo with a slightly floral note. And they’re fun as hell.
I used up my last batch straight away by putting them on Thai food and in yogurt, and then I made a batch of finger lime curd. It’s finger lime season again (typically runs from September through February, in the U.S.), so I told some coworkers about them. We got the fine folks at Shanley Farms to send us a couple packages to review on the blog, and I was positively swimming in these gherkin-lookin’ cuties. After giving away handful after handful for friends to experiment, I still had plenty to make a batch of finger lime curd. I improved on the version I made last time by waiting to add the vesicles till the curd was cool (in the hot curd, they burst). Today, we enjoyed it at the office spread on graham crackers, which makes a snack reminiscent of key lime pie, but I think I prefer the curd spread on a slice of soft baguette so you can really experience those bursty little “citrus caviar.” You can buy packages of finger limes from Shanley Farms online, and though they seem expensive, one small packet is enough to make this curd or garnish several dishes. Food experiments, friends!
Finger Lime Curd
Active time: 30 minutes | Total time: 1 hr 30 minutes | Makes: 10 ounces
Ingredients
200 grams / 7 ounces granulated sugar (just shy of 1 cup)
4 tablespoons unsalted butter
2 eggs, beaten
3.5 ounces lime juice (from about 3 limes)
1/4 cup finger lime vesicles (from about 12 finger limes)
Instructions
- With a fine microplane grater, grate 1 teaspoon zest from the finger limes.
- In a saucepan, whisk together eggs, sugar, zest, and lime juice. Cook over low, whisking frequently, until thickened, 20 to 22 minutes. Stir in butter and transfer to a glass bowl. Cover with plastic, pressing plastic directly against curd. Refrigerate 1 hour.
- Stir in finger lime vesicles and refrigerate (up to 1 week). Serve on crackers, baguette, cookies, ice cream, or stirred into yogurt.
Note: You can make this curd with regular limes, too. Just increase the zest to 2 teaspoons and use 4 ounces lime juice.


 Subscribe!